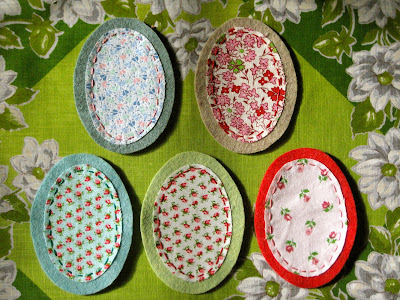
For Easter, which is coming so quickly, I thought I would share a little tutorial on these sweet felt and fabric eggs that I made to decorate my home.
Lovely Ingredients:
*felt in your choice of spring colors
*card stock scrap for template
*pretty spring fabric
*embroidery needle and floss
*stuffing
Let's get started!
Draw two egg templates on a scrap of card stock, one large and one a little smaller. You can make them whatever size you would like! :)

Then, with your pretty choice of felt, cut out two eggs of each color using the large template.
Next, choose some pretty fabric to go with each color. Using the smaller template cut out the fabric and place it on top of the felt.
Pin the fabric carefully onto the felt egg, and complete a running stitching around the fabric. Tie off in the back. Continue with each egg you made.
They should start to look like this when your are finished!
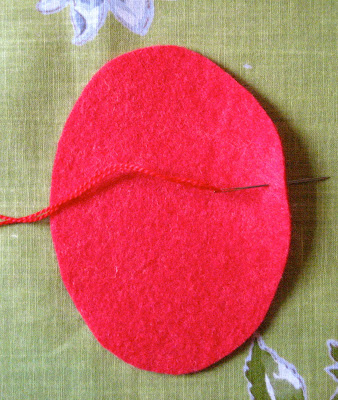
Now it is time to sew the egg together! Choose a color of embroidery floss that matches your egg, and thread your needle with a knot at the end.
You are going to complete a blanket stitch around the edge of the two pieces. Here is a link from Stitch School on how to complete a blanket stitch, if you have never done it before.
Take your thread, and enter it from the top of the blank felt egg.
Your knot should be on top. Now place the fabric egg on top of this.
Holding the two pieces together, start your blanket stitch.
Complete the blanket stitch all the way around, until you get to about an inch of the beginning of your stitch.
Take some of your stuffing, and stuff the egg.
Stuff it until it is nice a plump! ;)
Now you are going to finish stitching!
This is what your sweet egg should look like when you are done!
Flip the egg over, and put a knot in the thread. Enter the needle between the small opening of the two pieces.
Pull the needle up through the back of the egg.
Pull the thread tight and snip it with your scissors, so the thread disappears.
Here is your finished egg!! Not to bad, right?
Continue with all your eggs, and you should have yourself a most lovely group of Easter eggs to decorate your home!!
Hope you enjoyed this little tutorial and are having a wonderful week!! Have fun!!


Absolutely THE CUTEST little eggs! Going to attempt some this weekend. Thanks for sharing!
ReplyDeletexo P
Thank you!! You are so welcome, thanks for giving them a try!! Have a great night! xo Heather
DeleteThey are different and unusual, but very pretty
ReplyDeleteNina x
Thank you Nina!! I had fun making them! :) xo Heather
DeleteThose are really sweet you could fill them with lavender to your home would smell gorgeous to ;-) dee x
ReplyDeleteOh, thank you Dee! I love the lavender idea. I actually have some dried lavender, so I am going to do that! Thanks! xo Heather
DeleteSweet!!! You are so talented! Thanks for leaving comments on my blog...I love your bluebird title.
ReplyDeleteThank you so much!! They add such a sweet touch to my home! xo Heather
DeleteWhat a great tutorial.
ReplyDeleteThose eggs are so cute!
Thank you Trish!! They were fun to make! :) Hope you have a good night! xo Heather
DeleteWhat a great tutorial.
ReplyDeleteThose eggs are so cute!
Simply splendid. Fantastic tutorial too.
ReplyDeleteThank you so much Kim!! They had such a sweet touch to my home for Easter. :) xo Heather
DeleteWhile I very much enjoyed the eggs I had a hard time staying focused with those sweet floral hankies underneath them....Smiles...Renee
ReplyDeleteOh, the hankies! I knew you would like them!! Those are some of my favorite ones!! :) xo Heather
DeleteHi Heather,
ReplyDeleteBrenda, Cozy Little House sent me your way. What a cute idea for Easter eggs and so simple, too!
Hi! Thank you so much for coming by and visiting! I am so glad you liked my tutorial! They were fun to make, and add a handmade touch to my Easter decorations!! :) xo Heather
DeleteOh those are sooo cute! I love them!! I would love to make some of these! Thanks for showing the tutorial! I love handmade items for decorating, it makes such a pretty touch to things.
ReplyDeletePs. LOVE the teap cup in the last picture too! :) :) Have a wonderful Friday!
Thank you!! They were fun, and simple to make!! I am glad you liked the tutorial! Thanks, the tea cup is from Anthropologie. Hope you have a great day! xo Heather
DeleteHeather these are so sweet! OK I'm really going to make them! I have this HUGE box of the most wonder old quilt scraps that I bought at a garage sale for a quarter. I still haven't mastered my sewing machine. But these eggs...I could do this!
ReplyDeleteI'll show you when I'm done! Thank you for this cute project!
Erica :)
Hi Erica! Oh, I am so glad you are going to make them! Can't wait to see yours! I am sure they will be lovely with all those quilt scraps!! :) xo Heather
Delete***wonderFUL old quilt scraps! It's 1:25AM here!
ReplyDeleteI guess I should call it a night. Haaaa!
Oh, my you have working late! Your funny! :) xo
DeleteHi Heather! I loved this idea, on 04/06 is the birthday of my little Maria Clara, she'll do three years and found this great idea to give as a souvenir, since Easter is on 04/08.
ReplyDeleteVery, very, very beautiful!
Congratulations!
Have a blessed weekend.
Hugs.
Luciana
Hi Luciana! Thank you so much!! What a great way to use them for!! Let me know how yours turn out!! :) Have a blessed weekend, too! xo Heather
Deleteah! Vintage Eggs! How totally clever and ADORABLE!
ReplyDeleteThank you, thank you!! They were fun to make! :)
Deleteoh, heather, I really, really love these!!!
ReplyDeleteThank you Erin!! xo Heather
DeleteThese are simply sweet Heather. Love all the photos for the tutorial. Thanks for sharing. ~ Abby
ReplyDeleteThank you so much Abby!! I am glad you liked it!! Have a blessed day! xo Heather
Deleteyour eggs are simply the cutest!! LOVE them!!
ReplyDeleteThank you Kerri!! I had fun making them!! ;)
DeleteOh my goodness those are the sweetest little eggs EVER! I'm going to get my daughters to make some ... next year. ;) I just found you via Kerri and I'm so happy I did. :) I'll definitely be back to see more of your adorable things.
ReplyDeleteThank you for such a sweet comment!! I am glad you like them. They were so fun to make, and I love that I could use some of my favorite spring fabrics!! Thanks again for coming and visiting!! I look forward to talking with you again! xo Heather
Delete